Easy Beef Pasties: Master the Flaky Buttermilk Pie Crust
Ever wished you could whip up a hearty, flaky, and utterly satisfying meal without spending hours in the kitchen? Enter the humble, yet magnificent, beef pasty. These handheld savory pies, with their roots in the mining communities of Michigan's Upper Peninsula, are the ultimate comfort food. And if the idea of making them from scratch seems daunting, prepare to have your mind changed. Our guide to easy beef pasties focuses on simplicity, ensuring every bite delivers on flavor and that coveted, melt-in-your-mouth flakiness, primarily thanks to our remarkable buttermilk pie crust.
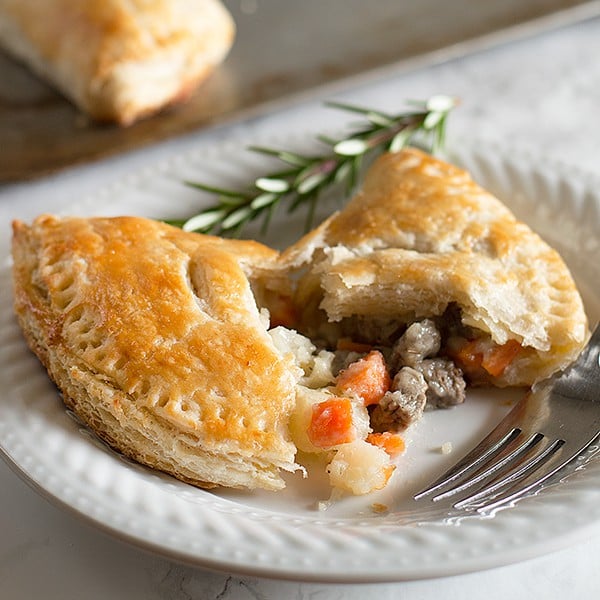
Imagine biting into a golden, buttery crust that shatters delicately, revealing a rich, savory filling of tender beef, diced potatoes, carrots, and onions, all swimming in a luscious, homemade gravy. This isn't just a meal; it's an experience, made accessible to even the most novice home cook. We're here to demystify the process, turning what might seem like a complex pastry into a straightforward culinary triumph.
What Makes These Beef Pasties So Easy (and Irresistible)?
The beauty of this recipe lies in its clever simplifications, designed to reduce intimidation without compromising on taste or texture. When we talk about easy beef pasties, we're talking about smart shortcuts that yield professional-quality results.
- Food Processor Pie Crust: Forget endless kneading and messy countertops. Our buttermilk pie crust comes together in a flash using a food processor. This not only speeds up the process but also ensures minimal handling of the dough, which is crucial for preventing toughness and achieving that desired flaky texture. It's a beginner-friendly method that consistently delivers.
- Pre-Cooked Filling: A common pitfall with many pasty recipes is undercooked meat or hard vegetables. Our approach eliminates this worry entirely. The savory beef, potatoes, carrots, and onions are fully cooked and tenderized on the stovetop *before* they even go into the pastry shell. This guarantees that every ingredient is perfectly cooked, and the flavors are deeply melded, creating a truly irresistible interior.
- Simple Assembly: While there's always an element of finesse with stuffed pastries, we streamline the assembly. The dough is remarkably forgiving and easy to roll, making the folding and crimping process much more approachable.
These elements combine to create a recipe that's not just "easy" in name, but truly simple to execute, allowing you to focus on the joy of creating delicious, homemade food.
The Secret to Supreme Flakiness: Our Buttermilk Pie Crust
The crust is undoubtedly the star of any pasty, and our flaky buttermilk pie crust is nothing short of revolutionary. If you've ever been nervous about making pie crust from scratch, this recipe will change your perspective entirely. Its ease of preparation and spectacular results make it a game-changer.
- Why Buttermilk? Buttermilk contributes a subtle tang and an incredible tenderness to the crust. Its acidity helps to break down gluten, resulting in a more tender crumb. Combined with cold butter, it creates steam pockets during baking, which are responsible for those beautiful, airy layers.
- The Food Processor Advantage: The key to a flaky crust is cold butter and minimal handling. A food processor excels at both. It quickly cuts the cold butter into the flour without warming it up, creating pea-sized crumbs that are perfect for flakiness. Plus, it mixes the dough in seconds, preventing overworking.
- Tips for Pie Crust Perfection:
- Keep it Cold: Always use very cold butter (cubed) and ice-cold buttermilk. You can even chill your flour beforehand!
- Don't Overmix: Pulse just until the mixture resembles coarse crumbs with some pea-sized butter chunks remaining. The dough should just begin to clump together.
- Hydration is Key: Add buttermilk gradually. The exact amount can vary based on flour and humidity. You want the dough to come together but not be sticky.
- Chill Out: After forming disks, refrigerate the dough for at least an hour. This allows the gluten to relax, making the dough easier to roll, and re-chills the butter, enhancing flakiness.
While store-bought crusts or your favorite go-to recipe can be substituted, we highly encourage you to try this buttermilk pie crust. Its superior flavor, ease of handling, and incredible flakiness truly elevate these easy beef pasties to another level. For a more detailed tutorial on this specific crust, you might find our related article, Irresistibly Flaky Beef Pasties: Simple Steps for Savory Perfection, particularly helpful.
Crafting the Hearty, Flavorful Filling
The heart of these pasties is their rich, savory filling. Starting with quality ingredients and building layers of flavor is essential for a truly satisfying bite.
- Brown the Beef: Begin by browning your ground beef. This crucial step develops deep, savory flavors through the Maillard reaction. Drain any excess fat to keep the filling from becoming greasy.
- Add Aromatics and Vegetables: Stir in diced onions, carrots, and potatoes. These classic vegetables provide sweetness, texture, and essential nutrients. For a more traditional take, especially if you're drawing inspiration from the Upper Peninsula, consider adding finely diced rutabaga, parsnips, or even peas for extra color and flavor. This is where you can personalize your pasties!
- Simmer to Tender Perfection: Cover the meat and vegetables with water or broth, add your favorite spices (salt, pepper, a touch of thyme or bay leaf work wonderfully), and bring it to a simmer. Allow it to cook until the potatoes and carrots are tender. This pre-cooking step guarantees that every component of your filling will be perfectly cooked through by the time the pasties emerge from the oven.
- The Quick Gravy: This is a game-changer for moisture and flavor. Once the filling is cooked, scoop out about a cup of the cooking liquid. Combine this with a little flour and butter to create a quick roux-based gravy. Stir this creamy mixture back into your meat and vegetables. This not only binds the filling together but also infuses it with incredible moisture and a luscious, rich taste.
- Cool Down: Allow the filling to cool slightly before assembling your pasties. Hot filling can melt the butter in your delicate pastry, leading to a tough rather than flaky crust.
Assembling Your Easy Beef Pasties
With your perfect crust and flavorful filling ready, it's time to bring your pasties to life. This process is simpler than you think, especially with our forgiving dough.
- Divide and Roll: Take your chilled dough disks and divide each into 3 equal pieces. On a lightly floured surface, roll each piece into a roughly 6-7 inch circle. Aim for an even thickness.
- Fill Generously: Spoon a generous amount of your cooled beef and vegetable filling onto one half of each dough circle, leaving a small border around the edge.
- Fold and Crimp: Gently fold the other half of the dough over the filling, creating a semi-circle. Press down firmly on the edges to seal. Then, use the tines of a fork to crimp the edges closed all the way around. This creates a beautiful, secure seal that prevents any delicious filling from escaping during baking.
- Egg Wash for Golden Glow: For that irresistible golden-brown finish and a slight sheen, brush the tops of your assembled pasties with an egg wash (one egg beaten with a tablespoon of water or milk). You can also rub them with a little milk for a golden color, as is traditionally done.
- Bake to Perfection: Place your pasties on a baking sheet and bake until they are gloriously golden brown and the crust is visibly flaky. The aroma alone will be enough to make your mouth water!
Beyond the Oven: Freezing and Enjoying Your Pasties
One of the most fantastic aspects of easy beef pasties is their incredible freezer-friendliness. They are truly an ideal make-ahead meal, perfect for busy weeknights or unexpected guests.
- To Freeze Unbaked Pasties: Assemble the pasties as directed, but do not egg wash. Place them on a baking sheet lined with parchment paper and freeze until solid. Once frozen, transfer them to a freezer-safe bag or airtight container. When ready to bake, brush with egg wash and bake directly from frozen, adding about 15-20 minutes to the baking time.
- To Freeze Baked Pasties: Allow freshly baked pasties to cool completely. Wrap each pasty individually in plastic wrap, then aluminum foil, or place them in an airtight freezer bag. They can be stored for up to 3 months.
- Reheating Frozen Pasties: For a quick reheat, simply pop a frozen, baked pasty into the microwave for 1-2 minutes until heated through. For a crispier crust, reheat in a preheated oven at 350°F (175°C) for 20-30 minutes, or until warmed through and the crust is crisp again.
Having a stash of these delightful pasties in your freezer means a wholesome, satisfying meal is always just minutes away. For more detailed strategies on meal prepping with pasties, check out our guide on Make-Ahead Beef Pasties: Freezer-Friendly Meals for Busy Days.
Whether enjoyed on their own as a hearty lunch, or served with a side salad for dinner, these easy beef pasties are guaranteed to become a new family favorite. Their portability makes them excellent for picnics, packed lunches, or road trips, bringing a touch of homemade goodness wherever you go.
Conclusion
From the first pulse of the food processor for that incredible flaky buttermilk pie crust to the final golden-brown pasty emerging from the oven, this recipe proves that truly delicious, homemade food doesn't have to be complicated. Our easy beef pasties offer a perfect blend of convenience, rich flavor, and satisfying texture, ensuring that even novice bakers can achieve culinary success. So, roll up your sleeves, embrace the simplicity, and get ready to enjoy a savory delight that will have everyone asking for more.
